
Introduction
Assembling a CPU (Central Processing Unit) is a complex yet rewarding task that requires attention to detail and technical expertise. The CPU is the brain of a computer, responsible for executing instructions and performing calculations. This essay will explore the step-by-step process of assembling a CPU, from selecting compatible components to installing the CPU onto the motherboard and completing the setup.Understanding CPU Components
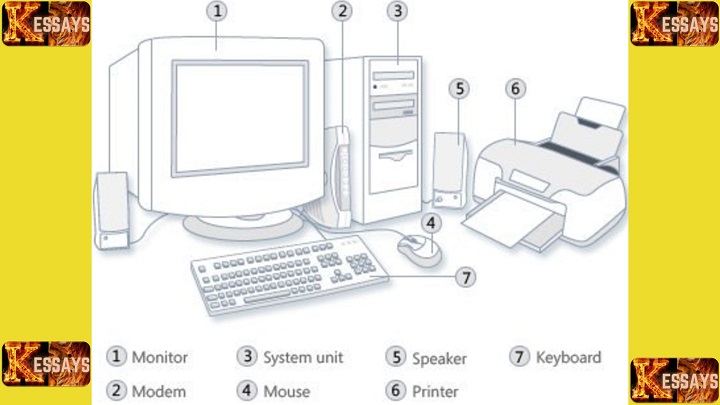
Before beginning assembly, it is essential to understand the components that make up the central processing unit (CPU) and its supporting hardware. The CPU works in tandem with other critical elements such as the heatsink, fan, thermal paste, and motherboard socket to ensure efficient performance and heat management.
The first step is selecting an appropriate processor. This choice depends on your computing needs and should take into account factors such as brand (Intel or AMD), clock speed, number of cores, cache size, and intended usage. Once the processor is chosen, you must also select a heatsink and cooling fan. The heatsink should match the socket type and provide sufficient cooling capacity, while the fan should complement the heatsink to ensure proper airflow. A good-quality thermal paste is also necessary, as it bridges microscopic gaps between the CPU and heatsink, improving heat transfer and reducing the risk of overheating.
Equally important is verifying that your chosen CPU is compatible with the motherboard’s socket type and chipset. Compatibility ensures that the system functions correctly once assembled.

Preparing the Workspace:
Before beginning CPU assembly, it is important to prepare a proper workspace that ensures both comfort and safety for handling delicate components. A clean, well-lit, and spacious area is ideal, preferably a dedicated table or workbench that provides enough room to organize all parts and tools.
Static-Free Environment
A static-free environment is essential to protect sensitive hardware from electrostatic discharge (ESD). This can be achieved by working on a non-conductive surface such as wood or cardboard, and by using an antistatic wrist strap connected to a grounded metal object. For added protection, an anti-static mat can also be used. Keeping the workspace free of dust, debris, and unnecessary metal objects further minimizes the risk of electrical shorts and accidental damage.
Adequate Lighting
Clear visibility is necessary when working with small and delicate components, so proper lighting is critical. A bright desk lamp or strong overhead light helps reduce errors and makes it easier to inspect connectors, pins, and sockets during assembly.
Essential Tools
Gathering the right tools beforehand ensures a smoother build process. A magnetic screwdriver with interchangeable bits is the most essential, while a thermal paste applicator is needed for proper application between the processor and heatsink. An antistatic wrist strap helps maintain grounding, and a magnifying glass can assist with inspecting small pins and connectors. Depending on the specific build, additional tools such as cable ties, wire cutters, or a small flashlight may also prove useful.
Organizing Components
Before starting the actual assembly, it is wise to organize all components neatly on the workspace. Place the motherboard, processor, heatsink, fan, and other parts within easy reach, and keep the motherboard manual open for reference. Taking time to review the layout of the motherboard and planning the order of installation helps prevent errors and ensures a smoother process.
Read Also: Client-server Architecture in Computer Networking
Motherboard Compatibility:
Processor and Socket Compatibility
One of the most important considerations when selecting a motherboard is ensuring that the processor is compatible. Different brands use different socket types, with Intel typically relying on Land Grid Array (LGA) sockets and AMD using AM4 or its successors. The processor and motherboard must share the same socket type for the installation to be physically possible.
Chipset and Specifications
Beyond the socket, the chipset determines the motherboard’s capabilities. It influences memory support, overclocking potential, and expansion options. A chipset that complements the processor allows the system to perform at its best. Specifications for supported processors and chipsets are usually available on the manufacturer’s website, and many retailers also provide compatibility tools and charts to simplify the process.
Using the Motherboard Manual
Once a motherboard has been chosen, the manual becomes an essential reference. It identifies the exact location of the CPU socket, the types of processors supported, and provides instructions on component installation. The manual also explains the layout of memory slots, expansion slots, jumper settings, and power connectors. Reviewing this information before assembly helps avoid costly errors.
Memory and Storage Support
Motherboards specify the type, speed, and maximum capacity of RAM they can accommodate. Checking these details ensures that your chosen memory modules will work properly. Storage compatibility is equally important. Reviewing the number and type of available SATA ports and M.2 slots ensures that the motherboard can support your current and future storage needs.
Expansion, Power, and Cooling
Expansion slots, such as PCIe lanes, should be checked for compatibility with graphics cards or other add-on cards. Power connections also require attention. Identifying the placement of CPU power connectors ensures that your power supply unit has the necessary outputs. Cooling support is another factor, as most motherboards include multiple fan headers. It is important to confirm that there are enough for the CPU cooler and any case fans required for proper airflow.
Rear I/O and Additional Features
The rear I/O panel determines connectivity for peripherals. Checking for adequate USB ports, audio jacks, and display outputs helps ensure convenience after assembly. Some motherboards also include additional features such as integrated Wi-Fi, enhanced onboard audio, or built-in graphics support. While not strictly necessary for every build, these features can be valuable depending on your intended use.
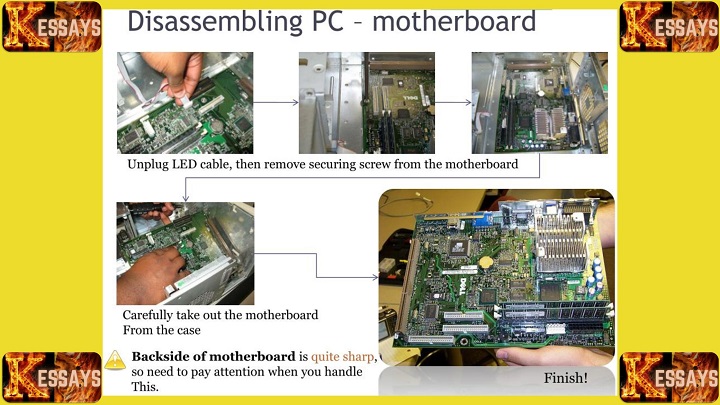
Preparing the Motherboard:
Before installing the processor and other components, it is important to ensure the motherboard is correctly positioned and securely fitted inside the case. Proper preparation minimizes risks of damage and ensures easier access to ports and connections later on.
Clear the Workspace
Before placing the motherboard, confirm that the workspace is clean and free from dust or debris that could interfere with installation.
Choose a Non-Conductive Surface
Set the motherboard on a safe surface such as its original packaging, an antistatic mat, or a clean cardboard box. Avoid metal or conductive materials, as they can create static electricity and damage sensitive circuits.
Handle the Motherboard Carefully
Always hold the motherboard by its edges. Avoid touching pins, connectors, or components directly, as even minor static or oils from fingers can cause long-term issues.
Install the I/O Shield
-
Orient the shield: Position the I/O shield (backplate) at the rear of the case, aligning cutouts with the motherboard’s ports.
-
Align properly: Ensure it fits perfectly within the case opening.
-
Snap into place: Apply gentle, even pressure around the edges until it clicks securely into position.
-
Double-check alignment: Confirm no part of the shield blocks the motherboard’s ports.
Position and Secure the Motherboard
-
Lower carefully: Place the motherboard into the case, aligning its mounting holes with the standoffs or risers.
-
Avoid force: If it doesn’t fit smoothly, check for misalignment rather than applying extra pressure.
-
Screw in gradually: Use the screws provided with the case. Start with the corner screws, tightening them lightly, then secure the rest in a diagonal pattern to apply even pressure.
-
Verify fit: Gently check that the motherboard does not move. A properly installed board should feel stable and firmly attached.
Inspect Connections
Once the motherboard is secured, confirm that:
-
The I/O shield cutouts align perfectly with the motherboard’s ports.
-
All screws are tightened but not over-tightened.
-
The board sits flush and evenly in the case.
Read Also: Comprehensive Handbook on Computer Systems
Installing the CPU
The processor is the core of your system, and installing it correctly is one of the most delicate steps in the assembly process. Precision and careful handling are essential to avoid damaging the CPU or socket.
Prepare the CPU Socket
Locate the CPU socket on the motherboard. It is a square or rectangular area with numerous small holes (Intel) or pins (AMD). Before handling, ensure the area around the socket is clean and free of dust or debris.
Unlock the Retention Lever
On the side of the socket, gently lift the retention lever or arm. This will open the socket and make room for inserting the CPU. Avoid applying excessive force—everything should move smoothly.
Identify the CPU Orientation
Examine the CPU carefully. Look for the golden triangle marker in one corner; this indicator aligns with a matching triangle or notch on the socket. Correct orientation is crucial for proper seating.
Align and Insert the CPU
-
Align carefully: Match the CPU’s golden triangle with the socket’s indicator.
-
Lower gently: Place the CPU into the socket, ensuring it drops into position naturally without pressure.
-
Handle safely: Hold the CPU only by its edges—never touch the pins (AMD) or contact pads (Intel), as they are fragile and sensitive to static electricity.
Confirm Proper Seating
Once inserted, check that the CPU sits flat and evenly in the socket. If it appears tilted or raised on one side, remove it gently and realign.
Lock the CPU in Place
Lower the retention lever back into its original position. It should click or latch securely, holding the CPU firmly in place. This action ensures a stable electrical connection with the motherboard.
Final Inspection
Before continuing with the build:
-
Verify the CPU is fully seated and locked.
-
Check for dust, debris, or foreign particles around the socket area.
-
Ensure no pins are bent (for AMD CPUs).
Applying Thermal Paste and Installing the Heatsink/Fan
Proper cooling is essential to keep the CPU operating within safe temperature ranges. Installing the heatsink and fan correctly, along with a thin, even layer of thermal paste, ensures efficient heat transfer and system stability.
Clean the CPU and Heatsink
Before applying thermal paste, check that the CPU’s heat spreader and the heatsink’s base are completely clean.
-
Use isopropyl alcohol (90% or higher) and a lint-free cloth or coffee filter to remove old paste or debris.
-
Allow the surfaces to dry fully before continuing.
Apply Thermal Paste
Apply a pea-sized dot (about a grain of rice) of thermal paste directly onto the center of the CPU’s heat spreader.
-
Avoid over-application. Too much paste can reduce cooling efficiency and create unnecessary mess.
-
Some builders prefer to spread the paste evenly with a plastic card or applicator. The dot method allows the heatsink’s pressure to spread it naturally.
Position the Heatsink
Carefully place the heatsink directly over the CPU.
-
Align the heatsink’s base with the CPU’s surface.
-
Make sure the mounting holes on the heatsink line up with the corresponding screw holes on the motherboard.
Orient the CPU Fan
If the heatsink includes an attached fan:
-
Ensure the fan cable is facing the CPU fan header on the motherboard for easy connection.
-
Refer to the motherboard manual if needed to confirm the correct header location.
Secure the Heatsink
-
Apply gentle, even pressure to seat the heatsink onto the CPU.
-
Secure it using the provided screws or clips.
-
Tighten screws gradually in a diagonal cross pattern to distribute pressure evenly.
Connect the Fan
Attach the CPU fan’s power cable to the CPU_FAN header on the motherboard. This allows the motherboard to power and regulate the fan’s speed based on temperature.
Verify Proper Installation
After installation, check the following:
-
The heatsink sits flat against the CPU with no gaps.
-
The fan is securely connected and free of obstructions.
-
The assembly feels firmly attached without wobbling.
Initial Testing
When powering on the system for the first time:
-
Confirm that the CPU fan spins correctly.
-
Monitor CPU temperatures in the BIOS or with monitoring software to ensure they remain within safe ranges.
Read Also: The Impact of UK Data Protection Laws on E-commerce
Connecting Power Cables and Fans:
Proper power delivery and cooling are essential for stable CPU performance. At this stage of assembly, the CPU power connector and CPU fan must both be connected correctly to ensure the processor receives sufficient power and remains within safe temperature ranges.
Connecting the CPU Power Cable
The CPU requires its own dedicated power source. On the motherboard, locate the CPU power connector, which is usually a four-pin or eight-pin socket positioned near the CPU socket. It is often labeled “CPU_PWR” or “CPU1.”
From the power supply unit (PSU), identify the CPU power cable. This cable typically has a black and yellow color scheme and is marked “CPU” or “CPU power.” Carefully align the cable’s connector with the motherboard’s CPU power socket. Since the connector is keyed to fit in only one orientation, it should slide in smoothly. Gently press until it clicks into place, ensuring a secure connection.
Connecting the CPU Fan
Cooling the processor is just as important as powering it. Begin by locating the CPU fan header on the motherboard. This small connector is generally labeled “CPU_FAN” or “CPU_FAN1” and is found near the CPU socket.
Next, take the CPU fan’s power cable, which usually ends in a three- or four-pin connector. Align this connector with the CPU fan header on the motherboard. It should only fit in one orientation. Push it firmly into place to ensure a solid connection.
Verifying and Managing Connections
Once both the CPU power cable and CPU fan cable are attached, check the connections to confirm they are fully seated. A loose connection may cause instability, intermittent shutdowns, or cooling failures.
Take a moment to manage the cables by routing them neatly through the case. Good cable management prevents obstruction of other components, improves airflow, and helps maintain a tidy build.
Initial Power-On
After securing the connections, switch on the power supply and press the computer’s power button. Observe the CPU fan to confirm it begins spinning immediately. This indicates that both power delivery and cooling are functioning as intended.

Finalizing the Assembly
Double-checking connections
Before closing the case, carefully inspect all the connections inside the computer. Confirm that every cable, including those for the motherboard, CPU, GPU, storage drives, and fans, is securely attached. This step ensures that no component is left unpowered or disconnected.
Checking component seating
Take a moment to verify that the CPU, GPU, RAM modules, and any expansion cards are correctly and firmly seated in their slots. Even a slightly misaligned part can cause errors or prevent the system from starting.
Reviewing cable management
Proper cable management helps maintain airflow and reduces the risk of cables interfering with fans or other moving parts. Make sure the interior of the case looks organized and free from obstructions.
Inspecting for loose screws
Examine the inside of the case for any screws that might have fallen during installation. Loose screws can cause short circuits or rattling noises, so it is important to tighten them or remove any that are not needed.
Reconnecting peripherals
If external devices such as monitors, keyboards, mice, or speakers were disconnected, reconnect them to their appropriate ports. This prepares the system for its first startup.
Powering on the system
Plug in the power supply, press the power button, and observe the startup process. A successful boot will usually display the motherboard’s splash screen or BIOS menu.
Accessing the BIOS
If necessary, enter the BIOS by pressing the designated key such as F2, Del, or F12 during startup. The BIOS allows you to review and adjust system settings, although it is best not to make unnecessary changes unless you are certain of their purpose.
Testing system stability
Once the computer starts successfully, run stress tests or benchmarking software to confirm stability. Monitor CPU and GPU temperatures to ensure that the cooling system is working effectively.
Installing the operating system
If the system is stable, proceed to install your preferred operating system. Follow the on-screen instructions to complete the installation and prepare the computer for use.
Adding drivers and software
After the operating system is set up, install the drivers for the motherboard, GPU, and other hardware components. It is also the right time to add any essential software you will need for daily tasks.
Final checks and closing the case
Perform a final test of all components and peripherals to confirm everything functions correctly. Once satisfied, place the case cover back on, secure it with screws, and ensure that all external ports and buttons are accessible.
Comments are closed!