
Introduction
Safety, Tools, and Preparation
Proper preparation is essential for success in the hardware installation and configuration session. Students must observe strict safety measures, use the correct tools, and maintain a clean, organized workspace to prevent damage to computer components and ensure effective learning.
A. Laboratory Safety Protocols
-
Electrostatic Discharge (ESD) Precautions: Always wear an antistatic wrist strap or work on an antistatic mat to prevent static electricity from damaging sensitive components such as the motherboard, CPU, or memory modules.
-
Power Safety and Grounding: Ensure that the computer is unplugged before beginning any work. Avoid working on a system that is connected to a power source and confirm proper grounding to reduce electrical hazards.
-
Handling Delicate Components: Handle all parts carefully by their edges to avoid damaging circuits or connectors. Components such as CPU pins and motherboard contacts require gentle handling to prevent bending or short-circuiting.
B. Tools and Materials Required
Use only appropriate tools to assemble and disassemble computer systems efficiently and safely. Essential tools include:
-
Screwdrivers: Both Phillips and flathead screwdrivers for securing or loosening components.
-
Antistatic Equipment: Wrist strap and mat to protect against ESD.
-
Thermal Paste: Used to ensure proper heat transfer between the CPU and the cooling system.
-
Cable Ties and Cutters: For organizing cables and maintaining proper airflow.
-
Cleaning Tools: A soft brush, blower, and lint-free cloth to remove dust and maintain a clean system.
C. Workspace Preparation
A well-prepared workspace promotes safety, organization, and efficiency.
-
Clean Environment: Work in a dust-free, static-free area to prevent contamination or damage.
-
Adequate Lighting and Ventilation: Ensure sufficient light to see small parts clearly and proper airflow to maintain a comfortable working environment.
-
Organization: Arrange components, screws, and tools neatly to avoid misplacement or confusion during assembly and disassembly.
By following these safety guidelines and preparation steps, students can perform tasks in the Computer Assembly and Disassembly Lab confidently and effectively.
Read Also: Client-server Architecture in Computer Networking
Step-by-Step Computer Assembly
The Computer Assembly and Disassembly Lab provides students with practical experience in building a computer from individual components. This process develops a deeper understanding of how hardware parts interact, how compatibility affects performance, and how safety and precision are maintained during installation. Each step reinforces key technical and problem-solving skills that are essential in computer hardware maintenance and system configuration.
Preparing the Workspace
Begin by setting up a clean, static-free, and well-organized workspace. This helps prevent electrostatic discharge (ESD) that can damage sensitive components. The surface should be non-conductive and free of dust or liquids. Gather all necessary tools such as screwdrivers, cable ties, and thermal paste before starting. Wear an antistatic wrist strap connected to a grounded surface and work on an antistatic mat. Proper preparation ensures safety and efficiency throughout the assembly process.
Selecting Compatible Components
Choosing compatible hardware is critical for a functional build. Confirm that the CPU fits the motherboard socket type and that the motherboard chipset supports the processor model. Check the memory type and speed to ensure it matches the motherboard’s supported RAM configuration. Select a power supply unit (PSU) with sufficient wattage to handle all system components, leaving some capacity for future upgrades. Choose storage devices such as HDDs, SSDs, or NVMe drives depending on speed, capacity, and budget. Careful component selection prevents system instability and compatibility errors.
Installing the Motherboard
Begin by inserting the I/O shield into the case opening. Place the motherboard on the standoffs already installed in the case, ensuring that each mounting hole aligns correctly. Use screws to secure the motherboard evenly, tightening them diagonally to prevent flexing or damage. Verify that the board is properly grounded and that there are no loose screws or metallic debris underneath. The motherboard serves as the foundation of the system, so secure installation is essential.
Installing the Processor (CPU) and RAM
Unlock the CPU socket lever and carefully align the processor with the orientation markers. Gently lower the CPU into the socket and secure the lever. Apply a small, pea-sized drop of thermal paste at the center of the CPU surface before attaching the cooling solution. Mount the heatsink or fan securely and connect its power cable to the CPU fan header. Insert RAM modules into the correct slots, pressing firmly until the clips click into place. Ensure dual-channel configuration is used for better performance.
Installing the Cooling System
Select a cooling method based on system needs. For air cooling, ensure the fan is properly oriented to direct air toward the case exhaust and connect it to the correct header on the motherboard. For liquid cooling, mount the radiator to the case, position the pump securely, and route the tubing without sharp bends. Verify that airflow direction promotes efficient heat removal. A properly installed cooling system maintains stable temperatures and ensures long-term component health.
Connecting Storage Devices
Mount the drives securely in their designated bays. For SATA drives, connect one cable to the motherboard and another to the PSU. For M.2 or NVMe drives, insert them directly into the motherboard slot and fasten with a screw. Keep cables organized using ties to allow unrestricted airflow and easy maintenance. Properly connected and secured drives are essential for reliable data access and operating system performance.
Installing the Power Supply Unit (PSU)
Position the PSU in the case compartment, usually at the bottom or top, with the fan facing an open vent for airflow. Secure it using screws and connect the 24-pin power cable to the motherboard, the 8-pin connector to the CPU power slot, and any required GPU power connectors. Use modular cables where possible to reduce clutter. Good cable management improves cooling efficiency and creates a professional appearance inside the case.
Installing Expansion Cards
Install expansion cards such as the graphics card, network card, or sound card in the appropriate PCIe slots. Ensure that the card is properly aligned before inserting it firmly into place. Secure it with screws and connect additional power cables if required. Check that the card sits evenly and that all ports are accessible from the back of the case. Correct installation ensures stable data transfer and optimal performance.
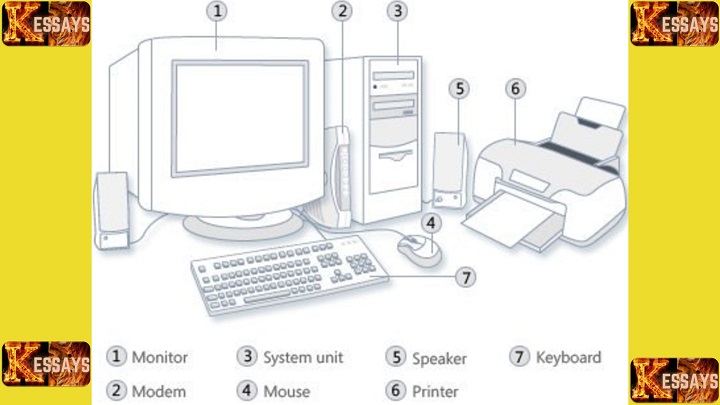
Connecting Peripherals
Attach all external devices needed for testing and operation. Connect the monitor using HDMI, DisplayPort, or VGA, depending on compatibility. Attach the keyboard, mouse, and any necessary USB devices or audio peripherals. Ensure all cables are firmly seated in their respective ports before powering on the system.
Final Checks and Powering On
Review all connections to confirm they are secure and properly placed. Verify that all fans are connected, RAM is fully seated, and no loose cables obstruct airflow. Plug the power cable into a surge protector or wall outlet and switch on the PSU. Press the power button to boot the system and enter the BIOS or UEFI setup to check hardware detection. Confirm that the CPU, RAM, and storage devices are recognized, and adjust boot settings if needed. Once verified, install the operating system and required drivers.
By following these steps carefully, students develop technical precision, systematic thinking, and safety awareness. The Computer Assembly and Disassembly Lab provides the foundation for mastering computer hardware installation, configuration, and maintenance, which are essential skills for professional IT and engineering practice.
Step-by-Step Computer Disassembly
Power Off and Disconnect Power Source
The first step in disassembly is to ensure complete power isolation. Begin by shutting down the operating system properly to prevent data loss or corruption. Once the system is fully off, unplug the power cable from the wall outlet. Hold the computer’s power button for several seconds to discharge any residual electricity in the capacitors. This reduces the risk of electrical shock and prevents damage to sensitive circuits. Always confirm that the system is fully de-energized before touching any internal components.
Grounding and ESD Safety
Static electricity can cause irreparable harm to computer components such as the motherboard, RAM, and CPU. Wear an antistatic wrist strap and connect it to a grounded metal surface to maintain electrical balance between your body and the hardware. Work on an antistatic mat or a clean, static-free surface. Avoid wearing wool or synthetic clothing that may generate static charge. This step ensures a safe environment for handling delicate electronic components.
Removing Peripherals
Disconnect all external devices including the monitor, keyboard, mouse, USB drives, Ethernet cables, and speakers. Unplug each device gently, avoiding excessive force on ports or cables. Arrange the peripherals neatly in a separate area and, if possible, label them for easy reassembly. Organizing cables and accessories prevents confusion, tangling, and potential port damage during future setup.
Disconnecting Power Supply Cables
Inside the case, locate and carefully unplug all power connectors from the motherboard, CPU, GPU, and storage devices. Start with the 24-pin ATX main power connector, followed by the 8-pin CPU power cable near the processor socket. Remove auxiliary GPU power connectors if present. Hold the plastic connectors firmly while disconnecting; never pull on the wires themselves, as this can loosen pins or damage sockets. Ensuring all power lines are safely disconnected protects both the components and the technician from short circuits.
Removing Expansion Cards
Expansion cards such as graphics cards, network interface cards, and sound cards are attached to the motherboard through PCIe slots. Unscrew the bracket securing each card to the case, press the release latch on the slot, and lift the card gently by its edges. Avoid touching the gold contacts or any circuitry on the board. Place removed cards in antistatic bags or padded containers to protect them from physical and static damage.
Disconnecting Storage Devices
Locate and detach all data and power cables from hard drives, solid-state drives, or M.2/NVMe storage modules. For SATA drives, gently pull the connectors straight out without twisting. Unscrew or unclip the drives from their mounting brackets. For M.2 drives, remove the small securing screw before sliding the drive out of its slot. Handle all drives carefully and keep them away from strong magnets or static surfaces. Store them in antistatic sleeves or protective enclosures.
Removing RAM Modules
Press outward on the clips located at both ends of each RAM slot. This releases the module from the locking mechanism. Pull the RAM stick straight upward with both hands, keeping it level to prevent bending the contacts. Avoid touching the gold pins or the memory chips. Place each module in an antistatic bag or its original packaging to prevent static discharge and contamination.
Detaching the Cooling System
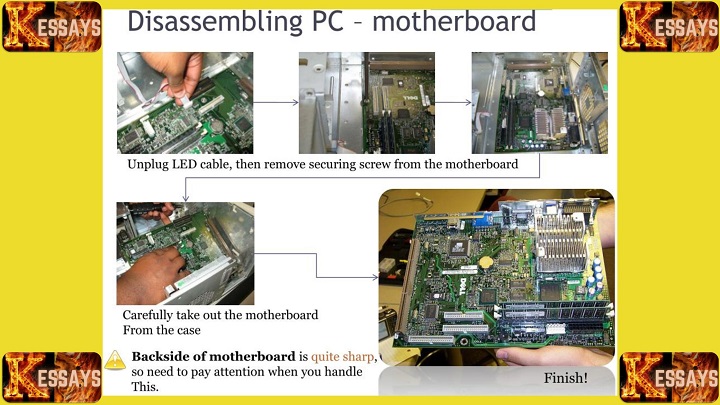
Unmounting the Motherboard
After all cables and cards are removed, unscrew the motherboard from the case standoffs. Use a diagonal unscrewing sequence to distribute pressure evenly and prevent bending. Gently lift the board using two hands, ensuring no cables remain attached. Place the motherboard on an antistatic mat or store it in an antistatic bag to prevent damage. Handle it only by the edges and avoid contact with circuitry or connectors.
Cable Management and Final Component Removal
Remove or cut any cable ties securing internal wiring. Detach remaining components such as the power supply unit, cooling fans, or optical drives. Unscrew the PSU carefully and slide it out of its compartment. Collect all screws, brackets, and small parts in labeled containers or magnetic trays to keep them organized. Proper cable and component management simplifies future reassembly.
Component Inspection and Storage
Once disassembly is complete, inspect each component for physical damage, corrosion, or dust accumulation. Clean parts using a soft brush or compressed air. Store every item in an antistatic bag or its original packaging to preserve its integrity. Place all components in a clean, dry, and static-free environment to prevent oxidation or static buildup.
By following this structured disassembly process, students in the Computer Assembly and Disassembly Lab learn how to work safely and systematically with computer hardware. These procedures build essential technical competence, reinforce attention to detail, and prepare learners for professional tasks such as system maintenance, component replacement, and diagnostic repair.
Read Also: Comprehensive Handbook on Computer Systems
Troubleshooting and Maintenance
Common Assembly and Boot Errors
Students must recognize and resolve issues that prevent successful startup or system stability. Typical problems include Power-On Self-Test (POST) failures, missing display output, or system beeping codes. Troubleshooting involves verifying that all power connectors are secure, RAM modules are correctly seated, and the CPU cooler is properly attached. Using diagnostic tools or motherboard indicators helps identify malfunctioning components quickly.
Diagnosing Loose Connections or Incompatible Parts
During assembly, minor misalignments or part incompatibilities can cause operational failures. Technicians should check that data and power cables are firmly connected, the motherboard standoffs are correctly placed, and all components match the system specifications. Verifying compatibility between the CPU, motherboard chipset, and RAM prevents system instability and hardware conflicts.
Regular Cleaning and Re-pasting Thermal Compound
Dust accumulation inside a computer case can cause overheating and reduce performance. Routine cleaning using a blower, soft brush, or compressed air helps maintain proper airflow. Reapplying thermal paste between the CPU and cooler every 12 to 18 months ensures efficient heat transfer and prevents thermal throttling or component damage.
BIOS Update and Configuration Tips
Reflection and Practical Exercises
Exercise 1: Assemble a Desktop PC from Scratch
Students begin by selecting compatible components such as the motherboard, processor, memory, and storage devices. They then follow systematic assembly steps, learning to handle components safely, apply thermal paste correctly, and organize cables for optimal airflow. This exercise emphasizes attention to detail, accuracy in component placement, and understanding of power and data connections.
Exercise 2: Identify and Replace a Defective Component
In computer assembly and disassembly lab, students engage in diagnostic testing and fault isolation. They simulate real-world repair scenarios where a system fails to boot or operate correctly. Using multimeters, visual inspection, and substitution testing, learners identify defective hardware such as a faulty RAM module, power supply unit, or storage drive. The exercise reinforces analytical thinking, methodical testing, and precise replacement procedures.
Exercise 3: Disassemble and Reassemble within a Time Limit
This timed exercise assesses both speed and accuracy. Students are required to safely disassemble a fully assembled system, organize all components, and reassemble it correctly. The focus is on maintaining ESD safety, avoiding component damage, and demonstrating an efficient workflow. Learners must verify functionality upon completion, ensuring that all hardware connections and BIOS settings are correct.
Assessment Rubric
Performance is evaluated based on adherence to ESD protocols, accuracy of assembly and disassembly procedures, cable management quality, and clarity of documentation. Each student must maintain a log of steps performed, identify any challenges encountered, and demonstrate functional system performance at the end of each exercise. Consistency, precision, and safe handling are the primary indicators of mastery in computer hardware practice.

Conclusion
The Computer Assembly and Disassembly Lab equips learners with foundational technical skills necessary for building, maintaining, and troubleshooting computer systems. By completing these activities, students gain confidence in handling delicate components, applying safety protocols, and executing precise assembly and disassembly tasks. This hands-on experience builds a strong foundation for careers in hardware repair, system building, and IT support, where accuracy, safety, and professionalism are critical to success.